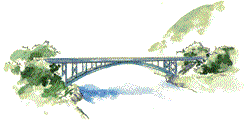
Day 7: Arch Bridges
Warm Up: Can a material become stronger just by bending it?
Activity:

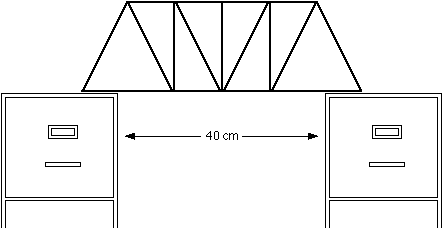
Homework:Begin Planning your popsicle stick bridge design.You may visit this web site: http://bellnet.tamu.edu/res_grid/trussb/designs.htm for help
Internet Resources:
Trusses: http://bellnet.tamu.edu/res_grid/trussb/designs.htm to see many more examples of truss designs and actual pictures of truss bridges.
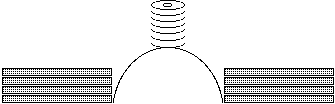
Arches: Pictures and descriptions of how arches work: http://207.99.133.13/science/7th%20Grade/bridges/arch_lessons/arch_lessons.htm
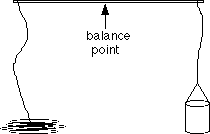
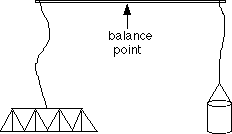
Test your bridges mass by building a balance:
 ..........
View Movie of Bridge Being Broken
Points = 300: 100 for completing a bridge, 200 according to strength
|
|
|
|
|
|
|
|
|
|
|
|
|
|
|
|
|
|
|
|
|
|
|
|
|
|
|
|
|
|
|
|
|
|
|
|
|
|
|
|
|
|
|
|
|
|
|
|
|
|
|
|


| 1. | understand that ratios are used to create scale models of buildings and structures; |
| 2. | understand the principles of ratio and apply these principles in the solution of problems; and |
| 3. | understand how to calculate scale using ratio. |


 |
 |
 |
 |
 |
 |
 |
 |
 |
 |
 |
 | ||||||
  |
 |
 | ||||||
 |
 |
 Materials Procedures Adaptations Discussion Questions Extensions  |
 Evaluation Suggested Readings Background Information  |
 Vocabulary Academic Standards Credit |
 |
 | ||
 | ||||||||
 |
 |
 |
 |
 |
 | |||
 |
 |
 |
Printable version of the complete lesson plan, including activity sheets. You need the free Adobe Acrobat Reader plugin. |  |
 | |||
 |
 |
 |
 |
 |
 | |||
 | ||||||||


| • | 0.25-inch graph paper |
| • | map(s) of the United States |
| • | pencils |
| • | ruler (metric or inches) |
| • | tape measure |
| • | Take-Home Activity Sheet: Home Measurements |

 | |||||
 |
 |
 |
 |
 |
 |
 |
 |
• | Use our Teaching Tools to create custom worksheets, puzzles and quizzes about this topic. |  |
 |
 |
 |
 |
 |
 |
 |
 |
 |
• | Discovery Channel School video: “Measurement
& Scale.” |
 |
 |
 |
 |
 |
 |
 |
 |
 | |||||
 |
 |
 |
 |
 |
 |


| 1. | Begin by introducing the concept of scale. Write the word scale on the board and brainstorm examples of where scales are found and what they measure. For example, we use scales to measure the weight of an object, the temperature of air, the length of an object, and so on. | ||||||
| 2. | Show students a map of the United States and point out the scale in the map key. Remind them that this map is a smaller, scaled-down representation of the United States, not an actual representation. Explain that sometimes we shrink objects or make them larger so they are easier to work with. The map is a scale model of an object that is too large to represent on paper. Other scale models represent objects that are too small, such as a diagram of an atom or a magnified view of a computer chip. Review the scale on the map. For example, the scale may say that 1 inch is equal to 50 miles. Explain that a scale is a ratio used to determine the size of a model of a real object. In this case, the map of the United States is the model. | ||||||
| 3. | A ratio is a relationship between two objects in quantity, size, or amount. For example, four quarters are in a dollar, so the ratio of quarters to dollar is 4 to 1. In other words, a quarter is one-fourth the value of a dollar. Have students think of other examples of how money can be turned into a scale, such as dimes to dollars (10:1 or 1:10) or pennies to dollars (100:1 or 1:100). | ||||||
| 4. | Illustrate how to draw an object to scale. Use a ruler to draw a square on the board with sides that equal 10 inches in length. Ask students how they might use this square to draw another that is half its size. Explain that an object is not simply cut in half when it is scaled down. The whole object is shrunk proportionally, meaning that it doesn’t change shape but is reduced to a smaller size. For example, if you could scale a carrot to half its size, you wouldn’t simply cut the carrot in half. All parts of the carrot need to shrink equally in size. | ||||||
| 5. | Now measure and draw a second square with 5-inch sides. Explain that when an object is scaled down, the length of its sides must be reduced by the same amount. Compare the corresponding sides of the two squares. The ratio of the small square to the larger is 5:10. Explain that a ratio can be expressed in three ways: 5:10, 5 to 10, or 5/10, which is a fraction that reduces to 1/2. | ||||||
| 6. | Remind students that the perimeter of an object is the sum of the length of its sides. So if an object has been scaled down proportionally, the perimeter of the object will scale down by the same ratio. For example, the perimeter of the smaller square is 20, or 5 × 4, which is half the perimeter of the larger square, which is 40, or 10 × 4. | ||||||
| 7. | Explain that students will use ratio to make a scale drawing of the classroom floor plan. First invite students to brainstorm a list of the kinds of people who might use scale drawings. (Examples include architects, construction workers, and cartographers.) | ||||||
| 8. | Divide students into teams of four. Explain that each team will measure the surface areas of objects in the classroom—the desks, tables, closets, and so on. The class may choose to use either metric or English measurements. Explain to students that their floor plan will show objects in the classroom as seen from above. Each group should have access to a tape measure, pencils, and paper to record their measurements. | ||||||
| 9. | Construct a class data table on the board with three columns labeled “object,” “measurement,” and “scaled measurement.” Students should copy this table in their notebooks and fill in the answers as they measure the objects. | ||||||
| 10. | Once teams have recorded all their data, they will decide on the scale of their floor plan. Distribute graph paper. With the class, discuss the proportions that would allow students to draw the entire room on one sheet of 8.5" × 11" graph paper. (For example, if the longest wall in the classroom is 16 feet long, then a scale of 1" = 1’ will not work. But 0.5" = 1’ will work perfectly.) | ||||||
| 11. | Use the agreed-upon ratio to create the proportion
for your classroom. Then have groups convert their measurements into
scaled equivalents. For example, if a desktop measures 2 feet in width and
the scale is 0.5" = 1’, use the following equation to figure out how large
the scaled drawing of the desktop should be.
0.5 inches divided by 1 foot = the scaled down length of the object divided by 2 feet Or, written as an equation of two ratios:
y = 1 inch | ||||||
| 12. | Students can determine their scaled equivalents by
cross-multiplying. Students should recall that when both sides of an
equation are multiplied by the same amount, the equation remains balanced.
In cross-multiplication, both sides of an equation are multiplied by the
denominators (the bottom numbers in the fractions). The result is the same
as multiplying across the “equals” sign diagonally (i.e., the “bottom
left” number times “top right” number equal to the “top left” number times
the “bottom right” number). Have students consider the following example:
    | ||||||
| 13. | Have students use their scaled measurement, rulers, and graph paper to draw the floor plan their team measured. Remind them to include a title, labels, and a scale. | ||||||
| 14. | As students complete their drawings, encourage them to calculate the perimeter of their classrooms. What is the relationship between the perimeter of the drawing and the perimeter of the actual classroom? | ||||||
| 15. | For homework, ask students to complete the sheet, asking them to make a floor plan of a room in their home. |


| 1. | Using what you have learned about ratios, proportions, and scale models, create four word problems for other students in your class to solve. For example: A square carpet measures 8 feet × 4 feet. Suppose the scale of a drawing containing the carpet is 1 foot to 1/4 inch. What are the dimensions of the carpet in the drawing? The answer: 2 inches × 1 inch. |
| 2. | Is it possible to draw scale models that are completely accurate? Why is accuracy important in the creation of maps, blueprints, and other scale models? |
| 3. | Compare your classroom floor plan to that of another student. How are they similar and different? Which would be more useful to a construction worker trying to build a classroom in a new school? Why? |
| 4. | List other instances in which you use ratio to compare objects in your daily life. Why is it important to maintain the same scale for each measurement you record when making your model? |
| 5. | Debate the merits of using the metric system and the English system to measure lengths. Explain how to convert between the two systems. |
| 6. | Compare your classroom to a nearby classroom using scale models of each. Explain how you could use estimation to create a scale model. Would the model be more or less accurate? |


 | |||||
 |
 |
 | |||
| Vocabulary
Quiz Whiz |
 |
Create a variety of interesting quizzes to test your students' word power. |  | ||
| Puzzlemaker |
 |
Send your students home with
word searches, crossword puzzles and more. This tool will help you create
unique puzzles using the vocabulary words from this lesson
plan. |
 | ||
| Glossary
Builder |
 |
Ten different options let you create a custom glossary out of any list of vocabulary words. |  | ||
 | |||||
 |
 |
 |
 |
 |
 |


| 1. | examine the structural flaws that caused three bridges to collapse, |
| 2. | determine what factors need to be considered in building a stable structure, and |
| 3. | compare and contrast the pros and cons of various bridge building materials. |


 |
 |
 |
 |
 |
 |
 |
 |
 |
 |
 |
 | ||||||
  |
 |
 | ||||||
 |
 |
 Materials Procedures Adaptations Discussion Questions Extensions  |
 Evaluation Suggested Readings Links Background Information  |
 Vocabulary Academic Standards Credit |
 |
 | ||
 | ||||||||
 |
 |
 |
 |
 |
 | |||
 |
 |
 |
Printable version of the complete lesson plan, including activity sheets. You need the free Adobe Acrobat Reader plugin. |  |
 | |||
 |
 |
 |
 |
 |
 | |||
 | ||||||||


| • | Computers with Internet access (optional but very
helpful) Each student will need the following: |
| • | Paper |
| • | Pencils and pens |
| • | Classroom Activity Sheet: Designing Bridges (see printable version) |
| • | Structures Fact Sheet (Distribute this to students if they don’t have access to the Internet and need the information in order to complete the activity.) (see printable version) |
| • | Take-Home Sheet: Top 10 Construction Achievements of the 20th Century (see printable version) |

 | |||||
 |
 |
 |
 |
 |
 |
 |
 |
• | Use our Teaching Tools to create custom worksheets, puzzles and quizzes about this topic. |  |
 |
 |
 |
 |
 |
 |
 |
 |
 |
• | Discovery Channel School video: “Collapse:
Failure by Design.” |
 |
 |
 |
 |
 |
 |
 |
 |
 | |||||
 |
 |
 |
 |
 |
 |


| 1. | Begin the discussion by showing the class two
photographs of the Tacoma-Narrows Bridge, in the state of Washington, in
the process of collapsing. You can find these images at the following Web
sites: Photo 1 Photo 2 |
| 2. | Ask students to brainstorm about the causes that forced this bridge to wobble and then fall apart. (You may want to ask them if certain weather conditions may have contributed to the bridge’s collapse.) Write their suggestions on a piece of newsprint. After discussing students’ ideas, explain that the cause of the collapse was winds of more than 40 miles per hour. |
| 3. | Discuss with the class two other bridges that have
collapsed:
|
| 4. | Using the information about bridge collapses as a starting point for discussion, ask students what variables must be considered when building a bridge. Point out that these include environmental factors, such as wind and temperature, building materials, and shapes used to support the structure. Also, discuss with the class the natural forces with which structures must contend, such as the weight of a building pressing down on the lower columns (compression) and natural stretching of materials (tension). Explain how these factors also must be taken into consideration when designing a bridge. |
| 5. | Divide the class into small groups of three or four
students. Tell each group to design a plan, or blueprint, for a bridge to
cross a gap in your city or town; the bridge could cross a river or join
two sections of land. Their goal is to propose the strongest, safest
bridge they can with the least expensive materials. As students work, have
them answer the questions listed below and record their findings on the
Classroom Activity Sheet: Designing a Bridge.
Forces Lab: squeezing, stretching, bending, sliding Materials Lab: wood, plastic, aluminum, brick, concrete, reinforced
concrete, cast iron, steel Shapes Lab: rectangles, arches, triangles |
| 6. | Have the groups write down their recommendations and draw their blueprints on the Classroom Activity Sheet: Designing a Bridge. Suggest that each student make a copy of his or her group’s recommendations. Then have the groups present their designs to the class. Give other students a chance to comment on the strengths and weaknesses of each design. |
| 7. | Assign the Take-Home Sheet: Top 10 Construction Achievements of the 20th Century for homework. Students will research one of the structures honored by the architectural community in 1999. They will record important facts about the structure and find out how it is reinforced to protect against destructive forces such as high winds, floods, and earthquakes. After students complete the assignment, have them share their findings with the class. |


| 1. | What are some of the forces that could cause a bridge to collapse? |
| 2. | What are the differences between concrete and reinforced concrete? |
| 3. | Which of the following shapes would be best able to handle pressure from the top: horizontal rectangle, arch, or triangle? Why? Which would be the weakest? |
| 4. | If you were developing a list of safety measure for bridges, what items would you include on your list? Why? |
| 5. | In addition to the bridges discussed in this lesson, can you name some other structures, such as dams, tunnels, or buildings, that have collapsed? Why did these structures collapse? |
| 6. | In 1979, the Kemper Arena in Kansas City, Mo., Was hit with severe thunderstorms. Because of its poor drainage systems, the roof filled with water. Why do you think this caused the building to cave in? |


 |
box
girder bridge |
 |
collapse |
 |
compression |
 |
I-beam |
 |
tension |
 |
torsion |
 |
unstable |


 | |||||
 |
 |
 | |||
| Vocabulary
Quiz Whiz |
 |
Create a variety of interesting quizzes to test your students' word power. |  | ||
| Puzzlemaker |
 |
Send your students home with
word searches, crossword puzzles and more. This tool will help you create
unique puzzles using the vocabulary words from this lesson
plan. |
 | ||
| Glossary
Builder |
 |
Ten different options let you create a custom glossary out of any list of vocabulary words. |  | ||
 | |||||
 |
 |
 |
 |
 |
 |


1. "bridge lesson plans." http://www.lincoln.smmusd.org/science/7th%20Grade/bridges/bridge.html (08/28/01 22:55:39)
2. "Architects in Action--Mathematics/Physical Science lesson plan (grades 6-8)--DiscoverySchool.com." http://school.discovery.com/lessonplans/programs/architectsinaction/index.html (08/28/01 23:09:34)
3. "Lesson Plans -- Stable and Unstable Structures -- (6-8, Technology)." http://school.discovery.com/lessonplans/programs/stableandunstable/index.html (08/28/01 23:10:44)
"Architects in Action--Mathematics/Physical Science lesson plan (grades 6-8)--DiscoverySchool.com." http://school.discovery.com/lessonplans/programs/architectsinaction/index.html (08/28/01 23:09:34)
"Lesson Plans -- Stable and Unstable Structures -- (6-8, Technology)." http://school.discovery.com/lessonplans/programs/stableandunstable/index.html (08/28/01 23:10:44)
"bridge lesson plans." http://www.lincoln.smmusd.org/science/7th%20Grade/bridges/bridge.html (08/28/01 22:55:39)