Java Applet Programming
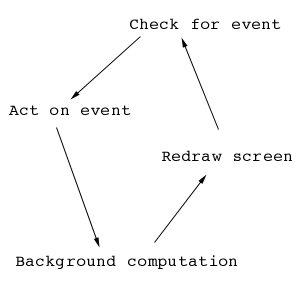
Java Applet Programming - Lesson 3Parts 1 & 2 of this tutorial covered drawing, double buffering, simple event handling, and screen layout. In order to be able to handle the full structure of the basic graphical user interface, we need more event handling ability, and we need to be able to run some computation in the background, without user instruction.
Suppose you want to create an applet which allows you to model the motion of a pendulum with a thin rigid rod. The interface should let you click on the pendulum bob, and place it wherever you want, and let it fall when you unclick on the mouse. Consider the following problem. You want to track the motion of a mass on a spring, which is pulled away from equilibrium, held at rest, and then let go. The solution will depend upon the initial position of the mass, the mass of the object, and the stiffness of the spring. The solution is x(t)=x(0)*cos(sqrt(k/m)*t) The interactive simulation should have the same layout as before, with the left half of the applet used for a graphical display, and the right half used for a control panel. Allow the user to set the initial displacement by clicking and dragging on the object in the display, and to set the spring constant and mass using scrollbars in the control panel. A run/stop button should be on the applet to start or stop the model, and a reset button should be on the applet to set everything to some default state. Let's start with the layout of the applet. We will need two Scrollbars for the mass and spring constant, and two TextFields in which to display the current values of the mass and spring constant for the user to see. We will need to place Labels for each control so that the user knows what they are changing. We will need a run/stop button, whose text changes to reflect what the button will do when pressed, and a reset button, to put the applet back to it's initial state. Using the skills you learned from the previous lesson, you might create an applet that looks something like this. Note the use of multiple panels to create a more robust layout. Advanced layout managers let you take this even further. Again, the drawing space is left as a regular Canvas until we get to creating our own class which inherits from Canvas. Also note the use of the Scrollbar class. Check the AWT documentation to understand the meaning of the elements in the Scrollbar constructor.
import java.awt.*;
import java.applet.*;

public class MassSpring extends Applet{

   Panel rightside;             //Panel to hold controls
   Panel rside1;                //Panels to subdivide rightside
   Panel rside2;
   Panel rside3;
   Canvas leftside;             //Canvas for drawing

   //control elements
   Button bt_startstop;
   Button bt_reset;
   Scrollbar sb_mass;
   Scrollbar sb_k;
   TextField tf_mass;
   TextField tf_k;

   public void init(){          //screen set up
                                //in init routine

      setLayout(new GridLayout(1,2));   //main applet
                                        //split into two
                                        //parts

      leftside = new Canvas();          //Canvas instantiated
      rightside = new Panel();          //Panel instantiated
      leftside.setSize(getSize().width/2,getSize().height);
      rightside.setSize(getSize().width/2,getSize().height);

      // set up control panel
      rightside.setLayout(new GridLayout(5,1));
      rside1=new Panel();
      rside2=new Panel();
      rside3=new Panel();
      rside1.setLayout(new GridLayout(1,2));
      rside1.add(new Label("Mass"));
      tf_mass = new TextField("1.0");
      rside1.add(tf_mass);
      sb_mass = new Scrollbar(Scrollbar.HORIZONTAL,50,10,0,90);
      rside2.setLayout(new GridLayout(1,2));
      rside2.add(new Label("1.0"));
      tf_k=new TextField("k");
      rside2.add(tf_k);
      sb_k = new Scrollbar(Scrollbar.HORIZONTAL,50,10,0,90);
      bt_startstop = new Button("Start");
      bt_reset = new Button("Reset");
      rside3.setLayout(new GridLayout(1,2));
      rside3.add(bt_startstop);
      rside3.add(bt_reset);
      rightside.add(rside1);
      rightside.add(sb_mass);
      rightside.add(rside2);
      rightside.add(sb_k);
      rightside.add(rside3);


      add(leftside);       //elements are added to the applet
      add(rightside);

   }
}
This applet does not yet have a real display, or any event handling. The scrollbars are set up to run from 0 to 100, but we have done nothing to convert that value to our actual physical values. We also have not yet set up the applet to run continuously. Let's start by creating a class MyCanvas which inherits from Canvas (much like the canvasobject class in the last exercise). The MyCanvas class should have double buffering, and should draw a mass connected to the walls by two horizontal lines (to represent springs). For a simple drawing like this, we might just pass the location at which to draw the mass when the applet tells MyCanvas to redraw itself, however, as your drawings get more complex, you will find that often you want to store the data required to complete the drawing in the MyCanvas class. We will do that here. A special note for Netscape users. Some Netscape java engines will treat the Scrollbar class differently. You may find your scrollbars range from 0 to 110 instead of 0 to 100. The following code creates our drawing canvas, implement it into the applet in the same way you did the canvasobject class in the last lesson.
import java.awt.*;
import java.applet.*;

public class MyCanvas extends Canvas{

   //we create our own version of the Canvas class to
   //meet our specific needs.

	Image im;
	Graphics buffer;

	double position=0.0;
	int xpixels_to_real=20; // 20 pixels = distance of 1
	double xscale=(double)xpixels_to_real;

	public void initCan(){
		im=createImage(getSize().width,getSize().height);
		buffer=im.getGraphics();
	}

	public void update (Graphics g) {
		paint(g);
	}

	//I want a routine which takes a real value and returns
	//a screen position
	public int xr2d(double xin) {
		//xreal=0.0 implies the middle of the screen, so
		//rescale and then shift to middle.
		//notice that the floating point calculation
		//has to be explicitly cast to an integer.
		return (int)(xin*xscale)+getSize().width/2;
	}

	public void prepaint()  {
		//prepaint draws to the graphics buffer, not
		//the screen, so that we do not see drawing
		//in progress.

		//clear the screen
		buffer.setColor(Color.black);
		buffer.fillRect(0,0,getSize().width,getSize().height);

		//draw the springs, to begin with, just draw a red
		//line across the middle of the screen.
		buffer.setColor(Color.red);
		buffer.drawLine(0,getSize().height/2,getSize().width,getSize().height/2);
		//draw the mass in blue
		int mass_size=4;
		buffer.setColor(Color.blue);
		buffer.fillRect(xr2d(position)-mass_size,getSize().height/2-mass_size,
			mass_size*2,mass_size*2);
		repaint();
	}

	public void paint( Graphics g ) {
		//paint places the image stored in memory
		//onto the screen as a single maneuver.
		g.drawImage(im, 0, 0, this);
	}

}
When you make your changes and compile, you should have the look and feel of the applet set, but no event handling and no idle time processing. Let's start adding in some event handling. When the scrollbars are changed, we need to have the applet modify the displayed text, and change the value of the mass and spring constant stored in memory. When the Scrollbar is modified, it posts an Event which we can react to. Unlike Button, which posts an event to the action routine, many controls post events which are handled by the handleEvent routine. This is one of them. The handleEvent routine is very similar to the action routine. Add two variables to the MassSpring class, x and mass. They should be doubles, and will be the storage space for the numerical values of the mass and the spring constant k. Also add a routine which will convert an integer value ranging from 1 to 100 (the Scrollbar values) to a double ranging from 0 to 10. The code for this conversion, as well as the handleEvent routine, are shown here.
	public double sbv2r(int sbin) {
		//scrollbars range from 0 to 100 as integers,
		//but should be converted to a range from 0 to
		//10 as doubles.
		return (double)sbin/10.0;
	}


    public void adjustmentValueChanged(AdjustmentEvent e) {
        if(e.getSource()==sb_mass) {
            mass=sbv2r(sb_mass.getValue());
            tf_mass.setText(""+mass);
        } else if (e.getSource()==sb_k) {
            k=sbv2r(sb_k.getValue());
            tf_k.setText(""+k);
        }
    }

    public void actionPerformed(ActionEvent e) {
      System.out.println("Got here!");
      if(e.getSource()==bt_startstop) {
         if (bt_startstop.getLabel().equals("Start"))  {
            start_model();
         } else{
            stop_model();
         }
      } else if(e.getSource()==bt_reset) {
         reset_model();
      }
    }
Be sure to implement and add your ActionListeners and AdjustmentListeners! Make the changes, compile the code, and run it to check it. You should now be able to move the scrollbars, and see the text displays change along with them. OK, so we can modify the input to the code using scrollbars, how about clicking and dragging on the mass to set the initial condition? We will need to add event handling for this, as well as a variable which stores whether or not the applet should ALLOW the mouse to be moved. When the simulation is running, for instance, we do not want the user to be able to change the position of the mass. Since the change will be made to the MyCanvas display, the event handling will be added directly to the MyCanvas class. Add a boolean variable is_input to MyCanvas to store whether or not the applet is allowing input, and add a handleEvent routine to allow the user to point and click to set the mass's x position. Also, in addition to being able to go from real to display coordinates, create a xd2r routine which takes an integer display coordinate and returns a double real coordinate. You need a constructor for the class so that you can add the Listeners when the class is instantiated.
    public MyCanvas() {
       addMouseListener(this);
       addMouseMotionListener(this);
    }
    //Handle mouse events

    public void mouseReleased(MouseEvent e) {
       if (is_input) {
          position=xd2r(e.getX());
          prepaint();
       }
    }
    public void mouseDragged(MouseEvent e) {
       if (is_input) {
          int temp=e.getX();
          if (temp<0) temp=0;
          if (temp>getSize().width) temp=getSize().width;
          position=xd2r(temp);
          prepaint();
       }
    }
    // event if you don't use them, you have to provide them
    public void mouseExited(MouseEvent e) {;}
    public void mousePressed(MouseEvent e) {;}
    public void mouseEntered(MouseEvent e) {;}
    public void mouseMoved(MouseEvent e) {;}
    public void mouseClicked(MouseEvent e) {;}
Compile and run to test. Now, all parts of the initial problem can be set, and the code can be made runnable. Java has a special extension to Applet which allows for runnable codes. We create a runnable applet by implementing Runnable in the class definition, and by adding a Thread, which allows for a separate line of computation from the main loop. We must provide three routines, run, start, and stop, to initialize the Thread. The following changes to your code will create a runnable applet.
//...
public class MassSpring extends Applet implements Runnable{
//...
//add to variable definitions
   Thread is_running=null;
//...
	public void start(){
		if(is_running==null) {
			is_running = new Thread(this);
			is_running.start();
		}
	}
	public void stop(){
		if(is_running!=null) {
			is_running.stop();
			is_running=null;
		}
	}
	public void run(){
		while(is_running!=null){
			try{
				is_running.sleep(100);
			} catch (Exception e) {
				System.err.println(e);
			}
		}
	}
OK, so now we have a runnable applet, but it doesn't actually DO anything. We need to have the run loop first check to see if the model is running, and run if it is. We need to store somewhere the current value of the time and the maximum pendulum position. It would also help to have a routine which initializes the problem before starting the run. Finally, we need an action routine to check and see if the start button has been pressed, and start the model if it has, and to check if the stop button has been pressed, and stop it if it has.
//...
public void run(){
		while(is_running!=null){
			try{
				is_running.sleep(100);
				if (bt_startstop.getLabel().equals("Stop")) {
					time=time+0.1;
					leftside.position=pos_max*
						Math.cos(Math.sqrt(k/mass)*time);
					leftside.prepaint();
				}
			} catch (Exception e) {
				System.err.println(e);
			}
		}
	}

	public void reset_model() {
		//stop model
		stop_model();

		//default parameters
		k=1.0;
		mass=1.0;
		sb_k.setValue(10);
		sb_mass.setValue(10);
		pos_max=0.0;

		//reset MyCanvas as well.
		leftside.position=0.0;
		leftside.prepaint();
	}

	public void start_model() {
		leftside.is_input=false;
		pos_max=leftside.position;
		time=0.0;
		bt_startstop.setLabel("Stop");
	}

	public void stop_model() {
		bt_startstop.setLabel("Start");
		leftside.is_input=true;
	}
//...
	public boolean action(Event evt, Object arg) {
		if(evt.target instanceof Button) {
			String label=(String)arg;
			if(label.equals("Start")) {
				start_model();
				return true;
			} else if(label.equals("Stop")) {
				stop_model();
				return true;
			} else if(label.equals("Reset")) {
				reset_model();
				return true;
			}
		}
		return super.action(evt,arg);
	}
Make these changes, compile, and test. You should now be able to have an applet which allows you to set the amplitude of your mass-spring system by clicking on the picture, and respond to controls by either the action or handleEvent routines, depending on which the control posts events to. Also, this applet shows you how to set up an idle-time processing loop to set up a time dependent model in the background. You now have an applet capable of user input, graphical display, and background computation. While your knowledge of JAVA will grow over time, you should now have the skills needed to begin writing online models. Check the examples page if you need a hint. Go on to the final challenge! |