Shape Explorer
|
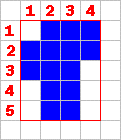
Student: Is there a way to calculate the area and perimeter of these objects without having to count everything? Mentor: Yes there is, let's look at an example. The first step is to "box" the object in. Then count the length and width of the "box".

Student: For this example the length is 4 and the width is 5. Mentor: The area of a rectangle is length times width. So, who can tell me the area of the "box"?
Student: The area of the box is four times five, which is twenty. But what does that have to do with the area of the shape inside? Mentor: Good question. How many squares are there in the "box" that are not a part of the object? Student: There are six squares in the "box" that are not a part of the object. Mentor: The area of the object is the area of the "box" minus the squares that are not part of the object. Student: The area of this object is twenty minus six, which equals fourteen. This method does reduce the amount of counting a little. But, what about the perimeter of the shape? Mentor: Good question! Now, let's find the perimeter of the "box". Perimeter is the distance around "the box". The distance around the "box" is:
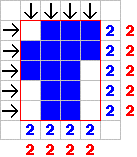
Student: For this example the perimeter is two times four plus two times five. Mentor: Yes it is. Remember that we multiply first and then add according to the order of operations. So the perimeter of the "box" is eight plus ten, which equals eighteen. Student: Now we know what the perimeter of "the box" is, but what does that have to do with the perimeter of the object? Mentor: They are the same! Student: Why would they be the same? That doesn't make any sense. Mentor: It makes sense if you look at the picture as the number of perimeter lines per row and column. The numbers in blue are the perimeter lines of the object in that column or row and the red numbers are the number of perimeter lines of the "box".

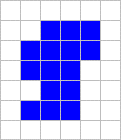
Now you can see that the perimeter of the "box" is actually the perimeter of the object. Student: Cool, does that trick work for all shapes? Mentor: No, this trick doesn't work for shapes that fold back on themselves. Adding one block to our example makes the trick not work. Can anyone figure out what makes our trick not work?

Student: Before you said that we should look at the picture as the number of perimeter lines per row and column. In this picture the number of perimeter lines of the shape does not match the number of perimeter lines of the "box". Mentor: Great Job! In the first column there are four shape perimeter lines and the "box" only has two. So the perimeter of the object is two more than the perimeter of the "box". So the perimeter of the shape is eighteen plus two, which is twenty. Student: So when the picture folds on itself, we have to scan the columns and the rows to see how many extra perimeter lines there are. Then we just add that to the perimeter of the box. Mentor: Good job! Now let's play with the Shape Explorer applet and see how well our method works. |
